For my 3rd card in my Sweet Citrus class, I featured the Sweet Citrus stamp set and hybrid embossing folder again. Did you know that the Hybrid Embossing Folder (with the coordinating dies included in this bundle) is back in stock now? I went a bit of a different route this time, featuring other fruits you can do with this stamp set. On this card, I chose to make the fruits non-citrus: Coconuts!

I had fun making this card, mainly because it was a remake of a card I made at a team event. I wish I had taken a picture of the card I was “case-ing”. Do you know what caseing means? It’s an acronym: Copy And Selectively Edit. If someone is having a bad stamping day and they have ZERO ideas (that DOES happen!), the best thing to do is to go to your card stash or to a catalog which is FULL of ideas. You choose a card sketch and change the designer paper, the stamp set, the colors … or maybe you use the colors but change the design of the card. That’s what caseing means.
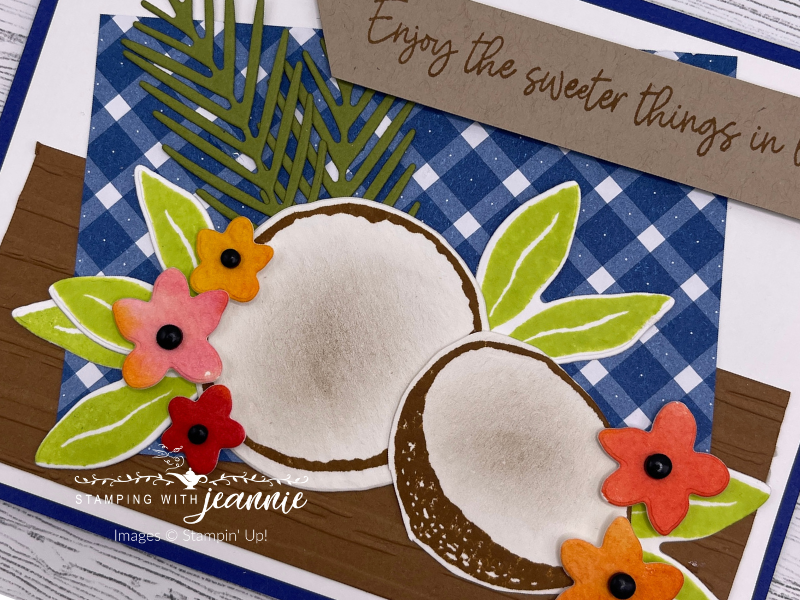
So, let’s dive into this card a bit! I stamped the coconuts in Pecan Pie ink on a square of watercolor paper. This gave the coconuts texture! Next, I took a blending brush and added just a “smudge” of Early Espresso ink. Oh yes, I only inked up 1/2 of that stamp — I didn’t need the 4 different shapes because the others didn’t look “citrus-y”. After you’ve stamped them, it’s quite easy to line up with the coordinating die and diecut the pieces.
Next, I had another small scrap of watercolor paper. I added just a couple of drops of reinker, Crushed Curry and Melon Mambo, to one of our clear blocks. Use a Water Painter (I used the medium one) to dilute the drops out on the block, then colored the watercolor paper. If you do the yellow flowers first, then pick up some Melon Mambo ink with your brush without cleaning, you end up with the orange flowers. Then, on a paper towel, squeeze out the brush and “clean” it, then pick up just the Melon Mambo ink. Let these dry, then diecut the flowers. If you want to speed up the process, you can use a heat tool to dry the paper too.
The brown at the bottom is a piece of Pecan Pie cardstock, embossed with the Stripes and Splatters embossing folders. This set of 2 folders is small enough to use in our Mini Stampin’ Cut & Emboss Machine! The extra texture goes a long way I think! The measurements for all of the cardstock pieces will be listed below. I centered it bottom, left and right on a Basic White cardstock piece.
The designer paper is again the Glorious Ginham paper — I talked about this designer paper and the blending brushes yesterday in this post. That is layered on top of the Pecan Pie.
You’ll need a scrap of Old Olive cardstock — it doesn’t have to be very big. You’ll cut 2 ferns with the Earthen Textures die — that’s the only one in my set that seemed to work. You could also use the Tropical Leaf bundle, another online exclusive product. I didn’t think of that till later! The other leaves are stamped in Lemon Lime Twist on a small Basic White cardstock scrap. There is a coordinating die … actually 2 dies, that cut out the leaves. I stamped 4 sets, meaning only 2 passes through the Stampin’ Cut & Emboss Machine!
Since I already talked about the flowers and the coconuts, the only thing left to do besides assembling is to stamp the sentiment. I used a scrap of Crumb Cake cardstock — I like to keep my cardstock strips when I’m cutting my cardstock layers for matting — many times, the strips are perfect for sentiment. I happened to keep a 3/4″ wide scrap — I stamped the sentiment in Pecan Pie.
Measurements:
Starry Sky cardstock (CS): 5-1/2″ x 8-1/2″, scored at 4-1/4″
Basic White CS: (2) 4″ x 5-1/4″ – for mat layer and inside layer; scrap 2″ x 2″ (for 4 leaves)
Pecan Pie CS: 4-7/8″ x 2″, embossed with the Stripes 3D EF
Glorious Gingham DSP, Blueberry Bushel: 2-3/4″ x 4″
Watercolor Paper, scrap 4″ x 2″ for coconuts, 3″ x 3″ for watercolored flowers
Old Olive CS scrap: 2″ x 2″ (for fern leaves — the stems don’t show so you can cut them off if they don’t fit on your scrap!)
Crumb Cake CS strip: 3/4″ x 3-3/4″ — snip the left edge to create a banner
Instructions:
Assemble the card, following my steps above. I only popped up the sentiment and the flowers with regular and/or mini dimensionals. Oh yes, make sure to add on some Black Classic Matte Dots — I used both small and medium dots depending on the flower size!
That’s it! The longest part of the process is waterpainting the watercolor paper for the flowers but the end-result is so worth it! If you still have questions, I’m including my Facebook Live video link here so you can watch and learn! Enjoy!
Jeannie