Good morning everyone! I named this post “Part 1” because I’ve discovered that there are hundreds of good ideas in the new 2011-2012 Stampin’ Up Idea Book and Catalog! In the past, I’ve browsed and browsed, but this year, I’m really trying to show that the catalog is more than just products! Who needs to go to the store for the latest issue of Cards (although this may not stop me!) with the catalog sitting right next to us?! (If you don’t have one yet, then you’d better email me soon! You don’t know what you’re missing!) I’m actually entering this into Gretchen Barron’s Inspiration in Action Catalog Case Contest that’s currently going on! Check out her blog here to see a bunch of other samples that people have submitted that feature cards etc. that they case’d in the new catalog! It’s a treasure-trove of new ideas!
So, that being said, my samples today come from page 59 and feature the stamp set, It’s a Wrap.


Inside the box is where I used the “Thanks SO Much” stamp — a little boho blossom adhered to one of my nuggets is adorable (IMO!).
The covers to each of the boxes are embossed using a different embossing folder — I embossed a strip of paper as well, then laid it over the Matchbox Cover of the die (the only thing not embossed that way was the thicker “strip” that is adhered on the side. If you have the die, you’ll see what I mean. If you don’t have the die, then go to my store! It’s great for a little thank you to a hostess, party favor, teacher gift, etc.!
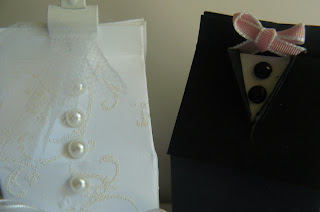
Lastly, let me share my milk cartons with you!
It’s a little difficult to make the white carton look like a bride, but I did my best! I used the “Elegant Style” swirl to emboss on the box with white embossing powder (just randomly stamped in VersaMark ink first). I did a double bow with the white organza ribbon on the front (since you won’t see the back!), some pearls down the front (I wish now that I had thought about a string of pearls around the neck!), and a white clip holding a snippet of white tulle that I had laying around since I cleaned out my craft closet this week!
The groom’s box was a bit easier: I just cut an underlying piece of white cardstock for the front of the box, then overlayed a piece of black cardstock that I cut half-way down and folded back for the jacket lapels. This part was easy because I remembered how I did my shirt card a few posts back seen here. I decided that the pink 1/8″ taffeta ribbon would be a nice touch as it matches the favor box that I made.
All in all, I think the whole set coordinates nicely and I had a great time (all day Saturday!!) creating!
Thanks for stopping by! Until next time … (when I show some photos of my open house) …
Jeannie


Wow! You did such a great job on this project! All your detail is wonderful. So glad you shared with us all!