I had so much fun making this adorable pop-up card using the SAB set, So Hoppy Together. Did you know that starting today, March 1st, you can get framelits that match many of the Sale-a-bration sets? It’s true! To be honest, I’d been getting tired of cutting these poor frogs by hand, so they were getting a bit neglected. Then, I had a chance to preorder these framelits and my stamping life changed!
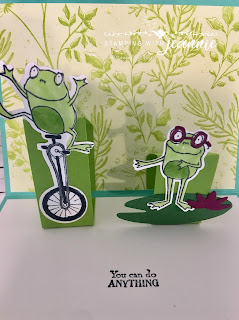
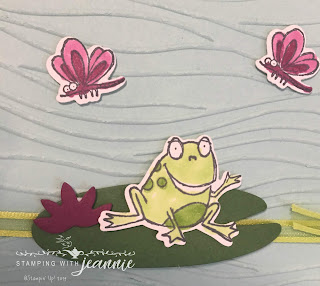
I did a FB live the other day, featuring this card, and realized that the frogs all resembled the chipmunks: Alvin, Theodore and … who was the third one?! Oh yes, Simon! Of course Alvin is riding the unicycle and Theodore is looking all studious with his hip glasses! That leaves Simon to be sitting on the lily pad, talking to his dragonfly friends!
OK, let’s get to the card. The base is Coastal Cabana. I then cut a layer of Granny Apple Green, followed by a Pool Party layer, embossed with the Big Shot and the Seaside folder. Don’t you think it looks like water?! I cut a Garden Green lily pad, accented with a Rich Razzleberry waterlily. Do you know that I couldn’t think of the name, Water Lily, for the life of me on my FB live? It was my first, and it was certainly memorable! Before I attached the Granny Apple Green and Pool Party layers, I tied a length of the Granny Apple Green Sale-a-bration ribbon around the card. (I’m pretty sure the ribbon is supposed to be available again on March 4th, so stay tuned! It’s so lovely to tie, and truly a great bargain at 5 yards per spool, in 5 colors!)
Inside, I cut a Whisper White insert for the bottom of the card, and another piece of the SAB Botanical Butterfly designer paper. Note that I cut two 1″ width pieces of cardstock in 2 lengths (I give measurements below), which are scored in 3 different places. The ONLY 2 important things to remember are that they can’t stick out above the folded card if you want them to fit in the envelope, AND, the middle score lines for the tabs should be exactly 1/2 the length of the cardstock(c/s) total length. I colored all of my frogs with Stampin’ Blends — the frogs are Light Granny Apple Green, with the Dark marker used to color the spots and the bellies of the frogs. The dragonflies are colored with the Light and Dark Rich Razzleberry Blends. Oh yes, and one more thing about the inside lily pad — I cut it out first full-size from a Garden Green c/s scrap, but then reinserted into the framelit to make it approximately 2/3 the size.
Today’s Tutorial:
Card Base: Coastal Cabana c/s, 5 1/2″ x 8 1/2″, scored at 4 1/4″
Layer 1: Granny Apple Green cs/, 5 1/4″ x 4″
Layer 2: Pool Party c/s, 5″ x 3 3/4″, embossed with the Big Shot and the Seaside embossing folder
Layer 3: lily pad, Garden Green c/s scrap, using lily pad framelit; water lily, Rich Razzleberry c/s scrap, cut out water lily (cut 2 since you’ll need one for inside); dragonflies and sitting frog: Whisper White c/s stamped with Tuxedo Black Memento ink, colored with blends (Granny Apple Green Dark for belly and spots, Light for body of frog; Rich Razzleberry Dark for body and inside wings of dragonfly, Rich Razzleberry Light for outside of wings.)
Card Inside:
Whisper White c/s, 4″ x 5 1/4″ (for bottom)
Sale-a-bration Butterfly “green leaf” pattern: 4″ x 5 1/4″ (for top)
Granny Apple Green c/s: 1″ x 6 1/2″, scored at 1″, 3 1/4″ (note the exact middle!), 5″; 1″ x 5 1/2″, scored at 1″, 2 3/4″, 4 3/4″
Attach the embossed Pool Party layer to the Granny Apple Green layer, then tie a length of Granny Apple Green
Sale-a-bration ribbon around these layers, then attach to the card base. Attach your lily pad, water lily, sitting frog (“Simon”) and dragon flies to the front, popping up with dimensionals.
Inside stamped images: Garden Green c/s scrap for small lily pad (cut full-size, then re-insert into framelit and cut to make smaller oval), Rich Razzleberry water lily, stamped frogs on Whisper White c/s scrap — stamped with Tuxedo Black Memento ink, colored with blends as above (I used the Rich Razzleberry Dark Blend to color “Theodore’s” glasses and Dark Black Blend for unicycle tire/Smoky Slate Dark Blend for bicycle “chain”)
Fold the tabs on the score lines. Attach the top and bottom of each of the tabs to the inside of the card (line up with the end of the cardstock/designer paper layers — don’t glue to the exact middle fold of the card because it will be too bulky to close). You can decide if you want the shorter or longer part of the tab to be attached to the top or bottom — if you attach the longer part to the bottom/front, your tab will stand up taller, whereas if you attach the tab to the back or top of the card, the tabs will lean back a bit. Attach your lily pad and water lily to the front of one of the tabs (I chose the shorter tab for this as I put “Theodore” in front of this tab), then attach the cut-out frogs. I cut out all of my frogs with the matching framelits, and you probably will want to do this too! Alternatively, cut them out by hand, and maybe use the lily pad from Lily Pad Lake for your inside and outside accent!
Enjoy this card, and have fun with it!! Leave me a comment if you make the card and can follow my directions. ?


