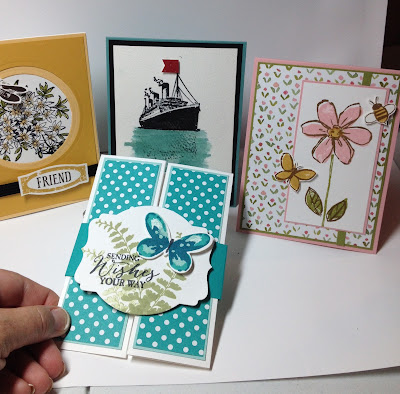
Hi all!! I want to share pictures of my “Seeing Double” card class that I held last night and this morning! I love the cards and so did all of my ladies!! They all had a “double” something to them!
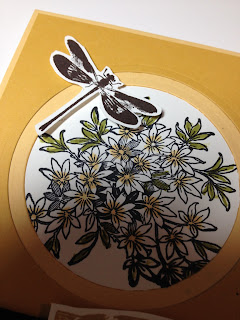
The card back left is made with the Awesomely Artistic stamp set — I showed the ladies how to make a Double Matted Frame card. Love the Hello Honey, So Saffron and Basic Black combo — the “friend” sentiment and the dragonfly are Early Espresso — I didn’t realize that the sentiment/label had a framelit to make cutting easy!! I handcut, but the Project Life framelits are the perfect size. The flower centers are colored with So Saffron ink and the blender pen. I used the Old Olive marker on the leaves because I wanted them to really show up!! You can see it a bit better in the photos below.
Next, the middle back card showcases the Reflection technique. Stamp the image on watercolor paper, then re-stamp on a piece of Window Sheet, flip over and brayer to create the reflection. My watercoloring of the water is not fabulous — several of the cards that the ladies made were so wonderful — my ship looks like it’s on a pedestal!! I may re-do after I finish writing this up!! I used the Traveler stamp set for the image. The water is Lost Lagoon. (I added a little flag — the paper is just a banner punch from the Merry Moments DSP — I had to cut it down length and width as it was a bit big, but I loved the general shape that the banner punch provided!) The card below was made by one of my ladies, Cathy G. Don’t you just love her watercoloring of the water?! It looks so realistic!!
The Blushing Bride Garden in Bloom card, top photo right, is copied almost exactly from Amy Koenders. I found the card on Pinterest and loved it immediately, as did my ladies! I don’t know that my measurements are the same as Amy’s — I realized that, at the end of her post, she had put her measurements for the card. I figured it myself and cut paper as I figured, so the measurements may be off by a 1/8″ or so on all!! Don’t you love her card? Oh yes, I also couldn’t find a good spot for the sentiment so I left mine off and just stamped one each of the butterfly and honeybee! By the way, the “double” in that card is the 2-step stamping — definitely a reach to fit in my class description but I loved the card so much!
The front card is a Double Z-Fold card. I found the measurements somewhere on You Tube I think. It’s so easy!! A 12″ x 5 1/2″ piece of Whisper White c/s, scored at 2″, 4″, 8″ and 10″. The panels are Pool Party. 1 3/4″ x 5 1/4″ , with Bermuda Bay polkadots paper (1 5/8″ x 5 1/8″) from the Brights DSP stack. Next, I made a belly band of 1 1/2″ x 10″ Bermuda Bay c/s, scored at 3″ and 7 1/8″. Make sure it’s loose enough to slide on and off of your card!
The butterfly above is from the Watercolor Wings stamp set. I just love this stamp set!! So many fun color combinations you can make!! I’m going to be working on a template soon that I’ll be sharing with my customers that buy or have bought this stamp set!! This particular color combination is Pool Party/Bermuda Bay/Island Indigo. I stamped the ferns (2 were directly stamped, one was stamped off once, and I stamped a 2nd fern off twice which you really can’t see underneath the butterfly) with Pear Pizzazz ink. The ferns and the sentiment are from the Butterfly Basics stamp set. You can see the “Happy Birthday” sentiment that I stamped inside. Both of the sentiments were stamped in Tuxedo Black Memento ink. Oh yes, the framelit shape is the 2nd-largest Deco Labels framelit. I cut it out before doing any of the stamping. The butterfly was stamped on scrap, then cut out with the small Butterfly Thinlit. I popped it up with 1/2 a dimensional.
 |
| Butterfly Basics sentiment stamped inside with Tuxedo Black Memento ink. |
Well, that’s all for today! Tomorrow I hope to share a card I made a few weeks ago for the Mojo Monday challenge! Please leave me comments!!


